

Welcome to the world of Galxe (GAL), a revolutionary blockchain platform that aims to transform the way we interact with digital assets. Whether you’re an experienced crypto enthusiast or just starting out, this step-by-step guide will help you navigate the world of Galxe and get started on your journey towards decentralized finance.
Galxe is built on the Ethereum blockchain, which means it offers the security and transparency that comes with a decentralized network. It’s designed to provide a seamless experience for users who want to buy, sell, and trade digital assets, without the need for intermediaries or traditional financial institutions.
Before you can start using Galxe, there are a few key steps you need to take. First, you’ll need to set up a digital wallet to store your GAL tokens. This wallet will also serve as your gateway to the Galxe platform, allowing you to interact with the various features and functions available.
Once you have your wallet set up, the next step is to acquire GAL tokens. You can do this by participating in the Galxe token sale, where you’ll have the opportunity to purchase GAL at a specified price. Alternatively, you can also buy GAL on supported cryptocurrency exchanges. Once you have your GAL tokens, you’re ready to start exploring the Galxe ecosystem and all it has to offer.
Whether you’re interested in staking your GAL tokens to earn passive income, participating in decentralized finance (DeFi) protocols, or simply trading GAL on the open market, Galxe provides a range of options to suit your needs. With its user-friendly interface and intuitive design, Galxe makes it easy for anyone to get started with blockchain technology.
Creating a Galxe Account
To get started with Galxe, you will need to create an account. Follow these steps to create your Galxe account:
- Visit the Galxe website at www.galxe.com.
- Click on the “Sign Up” or “Create Account” button.
- Fill out the registration form with your personal information, such as your name, email address, and password.
- Read and agree to the terms and conditions, as well as the privacy policy.
- Verify your email address by clicking on the verification link that will be sent to you.
- Once your email is verified, you can log in to your Galxe account using your email and password.
It is important to choose a strong password for your Galxe account to ensure its security. Make sure to use a combination of uppercase and lowercase letters, numbers, and special characters.
With your Galxe account, you will have access to all the features and services provided by Galxe. You can start exploring the platform, connect with other users, and participate in Galxe’s community.
Remember to keep your Galxe account credentials safe and secure. Do not share your password with anyone and be cautious when logging in on shared or public devices.
Now that you have created your Galxe account, you are ready to start your journey with Galxe and discover all the opportunities it has to offer!
Signing Up for Galxe
To get started with Galxe, you’ll first need to sign up for a free account. You can do this by visiting the free Galxe (GAL) website and clicking on the “Sign Up” button.
Once you’re on the sign-up page, you’ll be asked to provide some basic information, such as your name, email address, and a password. Make sure to choose a strong password that combines upper and lowercase letters, numbers, and special characters to ensure the security of your account.
After entering your information, click on the “Create Account” button to finish the sign-up process. You may also have to complete a captcha or verify your email address to confirm your account.
Once you’ve successfully signed up, you’ll have access to all the features and functionalities that Galxe has to offer. Take some time to familiarize yourself with the platform and explore its various tools and options.
Signing up for Galxe is quick and easy, and it opens up a world of possibilities for managing your tasks and projects efficiently. So why wait? Head over to the free Galxe (GAL) website and sign up today!
Verifying Your Email
To get started with Galxe (GAL), the first step is to create an account. After creating your account, you will receive an email with a verification link. It is important to verify your email address in order to activate your Galxe account and ensure the security of your account.
To verify your email, follow these simple steps:
- Check your inbox for an email from Galxe with the subject line “Verify Your Email”.
- Open the email and locate the verification link.
- Click on the verification link to activate your Galxe account.
Once you have clicked on the verification link, you will be redirected to a confirmation page confirming that your email has been successfully verified. From this point onwards, you will have full access to all the features and functionalities of Galxe.
If you haven’t received the verification email, make sure to check your spam or junk folder. If you still haven’t received the email after a few minutes, you can request a new verification email by logging into your Galxe account and going to the account settings page.
Verifying your email is an important step in the Galxe account creation process. It helps to ensure the security of your account and prevents unauthorized access. So, don’t forget to verify your email before getting started with Galxe!
Setting Up your Galxe Profile
Setting up your Galxe profile is the first step to getting started with the platform. Your profile serves as your digital identity and allows you to connect and collaborate with other users on Galxe.
To set up your Galxe profile, follow these steps:
- Create an account: Visit the Galxe website and click on the “Sign Up” button to create your account. Fill in the required information such as your name, email address, and password.
- Verify your email address: Once you’ve created your account, you’ll receive an email with a verification link. Click on the link to verify your email address.
- Add a profile picture: Personalize your profile by adding a profile picture. Click on the “Edit Profile” button and upload a picture of yourself or choose from the available options.
- Update your bio: Write a short bio to introduce yourself to other Galxe users. Mention your areas of interest, expertise, or any other information you’d like to share.
- Customize your settings: Galxe offers various customization options to tailor your profile to your preferences. Explore the settings menu and adjust options such as privacy settings, notification preferences, and account preferences.
- Connect with others: Start connecting with other Galxe users by searching for people or joining communities related to your interests. Networking is an important part of Galxe, so don’t hesitate to reach out and connect with others.
By setting up your Galxe profile, you’ll be able to engage with the Galxe community, share your ideas, and collaborate on projects. Make sure to keep your profile updated and active to maximize your experience on Galxe.
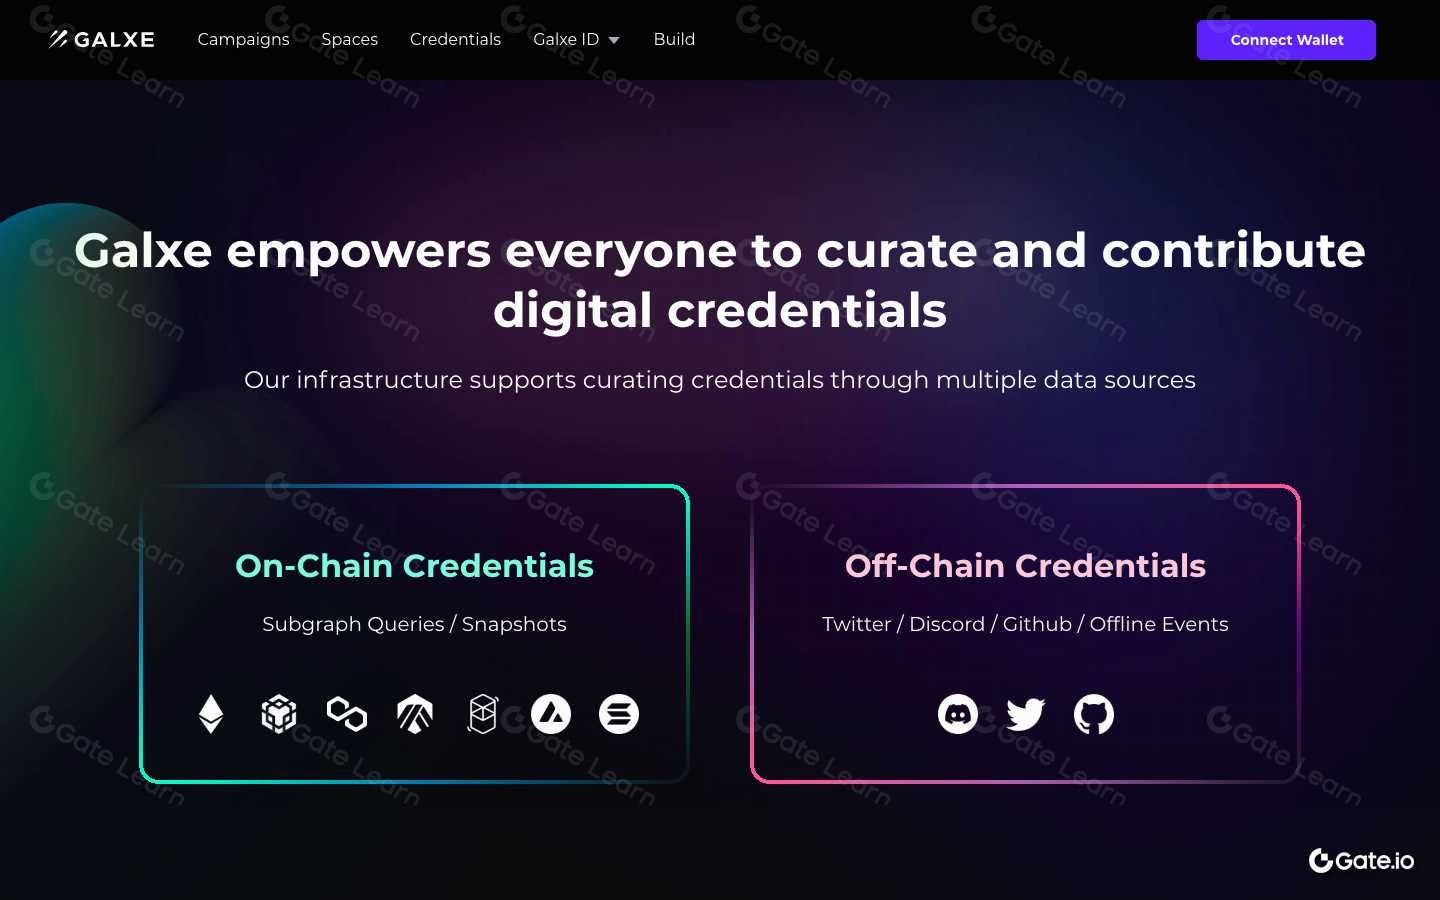
Exploring Galxe Features
Galxe is a powerful platform that offers a wide range of features for users to explore. Here are some of the key features that make Galxe an exceptional platform:
1. Decentralized Architecture: Galxe is built on a decentralized architecture, meaning that it does not rely on a central authority or server. This ensures a high level of security and prevents any single point of failure.
2. Smart Contracts: Galxe allows users to create and deploy smart contracts on its blockchain. Smart contracts are self-executing contracts with predefined conditions, enabling secure and automated transactions.
3. Scalability: Galxe is designed to handle a large number of transactions per second, making it highly scalable. This ensures that the network can accommodate the growing demand and maintain fast transaction speeds.
4. Privacy: Galxe offers privacy features that allow users to keep their transactions and personal information confidential. This is achieved through advanced cryptography techniques and the use of zero-knowledge proofs.
5. Interoperability: Galxe is compatible with other blockchain platforms, allowing for seamless integration with existing systems. This enables cross-chain transactions and facilitates the exchange of assets between different networks.
6. Governance: Galxe has a transparent and community-driven governance model. Users can participate in the decision-making process through voting and contribute to the development and improvement of the platform.
7. Developer-Friendly: Galxe provides a range of tools and resources for developers, making it easy to build decentralized applications (dApps) on the platform. The developer community is also vibrant, providing support and collaboration opportunities.
Overall, Galxe offers a comprehensive set of features that cater to the needs of both users and developers. Its decentralized architecture, smart contract capabilities, scalability, privacy features, interoperability, governance model, and developer-friendly environment make it an exciting platform to explore and utilize.
Navigating the Galxe Dashboard

Once you have successfully logged into your Galxe account, you will be greeted by the Galxe dashboard. The dashboard serves as the central hub for managing and monitoring all aspects of your Galxe experience.
Menu Navigation: At the top of the dashboard, you will find the main menu navigation. This menu allows you to easily switch between different sections of the dashboard, such as Wallet, Trade, Staking, and more.
Account Information: On the left-hand side of the dashboard, you will see your account information. This includes details such as your account balance, transaction history, and GAL holdings.
Market Overview: The main section of the dashboard provides a market overview. Here you can view real-time price charts, track market trends, and analyze the performance of different cryptocurrencies.
Trade Options: If you navigate to the Trade section, you will find various trade options. Galxe supports features such as spot trading, limit orders, and stop-loss orders, allowing you to execute trades in a secure and efficient manner.
Staking: Galxe also offers a staking feature, allowing you to earn passive income by staking your GAL tokens. By navigating to the Staking section, you can view your staking rewards, delegate your tokens, and monitor your staking activity.
Security Settings: It is important to ensure that your Galxe account is secure. By accessing the Security Settings section, you can enable two-factor authentication, set up alerts and notifications, and manage your API keys.
Support and Help: If you ever encounter any issues or have questions, Galxe provides a comprehensive Help Center. You can access the Help Center from the top menu navigation, where you will find a detailed knowledge base and a way to contact support.
Take the time to familiarize yourself with the Galxe dashboard and explore its features. The dashboard is designed to be user-friendly and intuitive, making it easy for even beginners to navigate and manage their Galxe experience.
Connecting with Other Galxe Users

One of the great things about Galxe is the ability to connect and interact with other Galxe users. Here are some ways you can connect with other users:
- Join the Galxe community forum: The Galxe community forum is a great place to connect with other users, ask questions, and share your experiences. Be sure to introduce yourself and connect with others who have similar interests.
- Participate in Galxe events: Galxe often hosts events such as webinars, workshops, and conferences. These events are an excellent opportunity to meet and network with other Galxe users. Keep an eye out for upcoming events and mark your calendar.
- Follow Galxe on social media: Galxe has a strong presence on various social media platforms. By following Galxe on platforms like Twitter, Facebook, and LinkedIn, you can stay up to date with the latest news, updates, and connect with a broader community of Galxe users.
- Explore online discussion boards: There are many online discussion boards and communities where Galxe users gather to discuss and share their experiences. Participating in these discussions can help you learn new tips and tricks, troubleshoot any issues you may be facing, and connect with other users.
- Attend Galxe user group meetings: Many cities have Galxe user groups that meet regularly. These meetings offer a chance to meet other local Galxe users, exchange ideas, and learn from each other’s experiences. Check if there is a user group in your area and consider attending their meetings.
Remember, connecting with other Galxe users can enrich your experience with the platform and provide valuable insights. Don’t hesitate to reach out and engage with the Galxe community.
Customizing your Galxe Experience
Once you have created your Galxe account and familiarized yourself with the basic functionality, you can start
customizing your Galxe experience to suit your preferences. Here are some key ways to personalize your Galxe
account:
-
Choose a profile picture: Adding a profile picture helps others to recognize you and makes your
Galxe account feel more personal. You can easily upload a profile picture by going to your account settings and
navigating to the “Profile” section.
-
Customize your notification settings: Galxe allows you to control the types of notifications you
receive. Whether you want to be notified about new messages, friend requests, or other activities, you can choose
your preferences in the “Notifications” section of your account settings.
-
Create a personalized bio: Adding a bio to your Galxe profile gives others a glimpse into your
interests, hobbies, or professional background. You can edit your bio by going to the “Profile” section of your
account settings and filling in the appropriate fields.
-
Organize your Galxe feed: With Galxe, you can customize your feed to prioritize the content you
want to see most. You can follow or unfollow specific users, join communities, and adjust your feed settings to
tailor your Galxe experience.
-
Explore Galxe themes: Galxe offers various themes that allow you to change the look and feel of
the platform. Whether you prefer a light or dark theme, or if you want to try out different color schemes, you can
easily switch between themes in your account settings.
Remember, customizing your Galxe experience is all about making the platform work for you. Experiment with different
settings to find what suits your preferences best and enjoy a personalized and tailored Galxe experience.
Managing Your Galxe Account

Managing your Galxe account is an essential part of getting started with Galxe (GAL) and maximizing your experience on the platform. To ensure a smooth and secure experience, it is important to familiarize yourself with the available account management features.
First, you will need to create a Galxe account if you don’t have one already. Visit the Galxe website and click on the “Sign Up” button. Fill in the required information, including your name, email address, and desired password. Make sure to choose a strong password to protect your account.
After creating your account, you can log in using your email address and password. It is recommended to enable two-factor authentication (2FA) for an extra layer of security. Galxe supports popular 2FA apps like Google Authenticator and Authy.
Once logged in, you can access various account management features from the user dashboard. Here, you can view and modify your account information, such as your profile picture, personal details, and contact information. It is important to keep your account information up to date, as it may be used for verification purposes or to contact you regarding your account.
In addition to managing your personal information, you can also manage your Galxe wallet from the user dashboard. This includes depositing funds into your wallet, checking your account balance, and making withdrawals. Galxe supports various cryptocurrencies, so you can choose the one that suits you best.
If you have any issues or need assistance with your account, Galxe offers a support center where you can find helpful articles and resources. You can also contact the Galxe support team directly for personalized assistance.
Overall, taking the time to manage your Galxe account and keeping your information secure is crucial for a successful and enjoyable experience on the platform. By utilizing the available account management features, you can maintain control over your account and ensure a smooth trading experience.
FAQ:
What is Galxe (GAL)?
Galxe (GAL) is a cryptocurrency that aims to provide a decentralized data storage and sharing solution. It utilizes blockchain technology to ensure secure and transparent transactions.
How can I start using Galxe?
To start using Galxe, you need to follow a few simple steps. First, you need to create a wallet to store your GAL tokens. Then, you can purchase GAL tokens from a cryptocurrency exchange. Once you have the tokens, you can start using them for data storage and sharing on the Galxe platform.